This blog post comes from Adelheid Hansen, an intern in the Conservation department.
It was a dream come true to be an intern in the Conservation Lab of The Corning Museum of Glass for eight weeks in early 2018. Shortly before coming to Corning, I graduated from West Dean College (UK) with an MA in Conservation Studies, specializing in glass and ceramics.
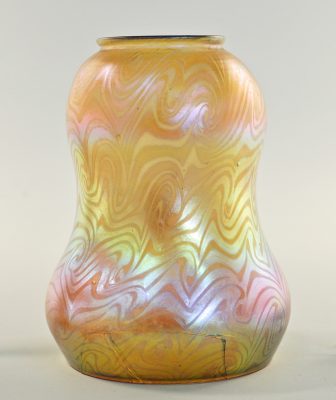
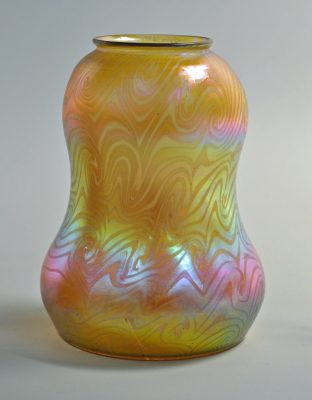
During my stay in Corning, I would go once a week with Stephen Koob, chief conservator, to the storage facility of the museum to wash glass. This blog post explains why and how washing of glass takes place. At the time I was there, there was a large collection of early 20th century American lampshades that needed washing (figures 1 and 2).
-
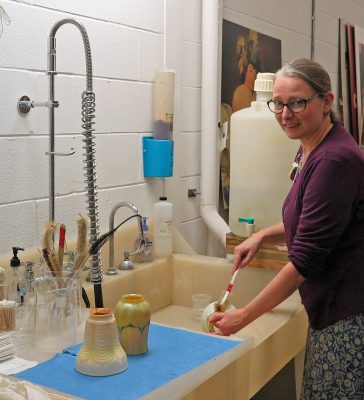
- Fig. 1: Washing the lampshades.
-
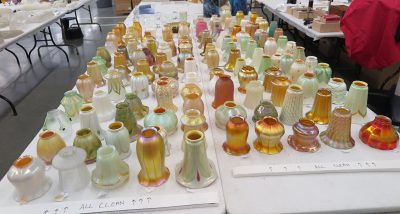
- Fig. 2: Lampshades after washing.
In addition to washing, I inspected each lampshade for damage. For instance: cracks, missing areas, detached shards or previous restorations. We took lampshades with damage to the Conservation Lab where they landed on my desk. This blog post describes the treatment of three of them.
Each of these lampshades presented a different challenge and needed a different approach, but they all needed the use of adhesives. I used two types of adhesives: a conservation grade acrylic (Paraloid B72 in acetone) and epoxy resins. Both types have a clear appearance, but in other aspects they are very different. The table below shows the main differences between the two adhesives which we take into account when choosing which one to use.
| Adhesive | Advantage | Disadvantage | Mostly used on |
| Paraloid B72 | Easily reversible. Remains very stable long term. |
Visible air bubbles. Softens above 104°F/40°C |
Archaeological glass. Opaque glass. |
| Epoxy resins for glass conservation | Ideally no air bubbles. Choosing a resin that approaches the refractive index of the glass can make the break lines almost disappear. |
Not easily reversible. Is stronger than the glass, which can cause damage. Will eventually yellow. |
Clear glass. |
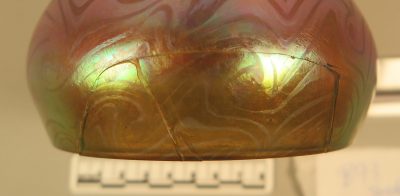
Lampshade B32

Fig. 3: Lampshade B32 before treatment.
Condition before treatment: There was one large detached shard and a running crack of 8 cm long (figure 3).
Challenge
The shard had a peculiar shape and was not easy to put back into place. This was made even more challenging because the shade had sprung after breaking. A sprung object is slightly distorted because of a break. Often an object holds tension in it that is released when it breaks, causing the form to change slightly.
Treatment
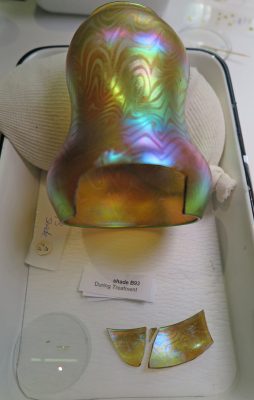
The shade had to be pushed into its old shape in order to position the shard, but the pressure could cause the running crack to elongate, therefore it had to be carried out in a very controlled manner. This was not a one-person job, and luckily conservators Astrid van Giffen and Lianne Uesato came to the rescue (figure 4).
-
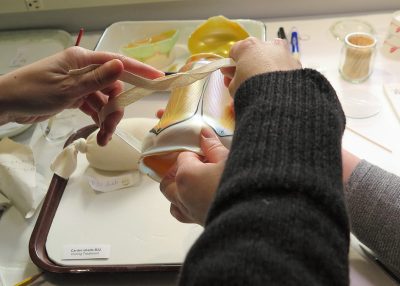
- Fig. 4: Extra hands and carefully applied force were needed to get the shard back into its correct location.
-
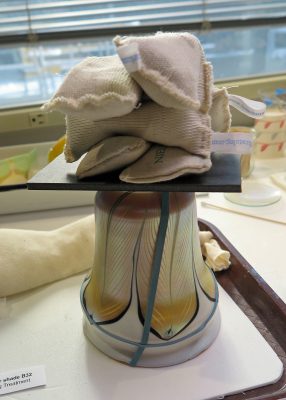
- Fig. 5: Elastic bands and weights were used to keep the shard in position while the adhesive cured.
Paraloid B72 was applied to the break lines and the shard was reattached. The shade, however, wanted to go back to its sprung state while the adhesive was setting. To prevent this from happening, elastic bands were tied around the shade, and weight in the form of little lead bags was piled on top of the shade, giving it the appearance of wearing a hat (figure 5).
The rubber bands and the weight were removed after the adhesive had cured.

Fig. 6: Lampshade B32 after treatment.
Lampshade B155

Fig. 7: Lampshade B155 before treatment.
Condition before treatment: There was a previous restoration of a break about 2 cm from the rim that had discolored (figure 7).
Challenge
It can be quite a puzzle to determine which solvent will dissolve the previous adhesive, because it is not always clear what was used, especially when there is no documentation of the previous treatment.
Treatment
Before starting treatment, we needed to find out which adhesive was used. One method of determining the previous adhesive is by viewing it under Ultra Violet (UV) radiation, which will cause some adhesives to fluoresce (illuminate in a particular color). However, it can be difficult to interpret the color. In this case, it was hard to tell if the fluorescence was greenish white or bright white. I used a table, which listed the illuminated colors,[1] and saw that it could be either an epoxy resin or cellulose nitrate. Therefore, the first solvent I tried was acetone. I attached cotton wool around the break line with a rubber band and saturated it with acetone (figure 8). Then I placed the lampshade in a closed plastic bag in the fume hood and left it overnight.
When I checked the next day, nothing had happened, so I had to try another method. I placed the shade in a bowl of warm water, which seemed to soften the adhesive (figure 9).
-
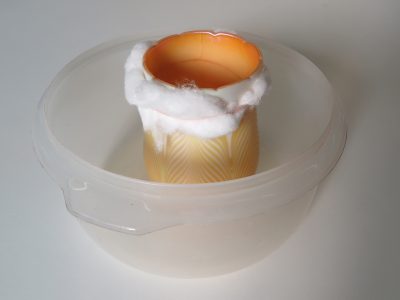
- Fig. 8: Cotton wool attached with rubber band.
-
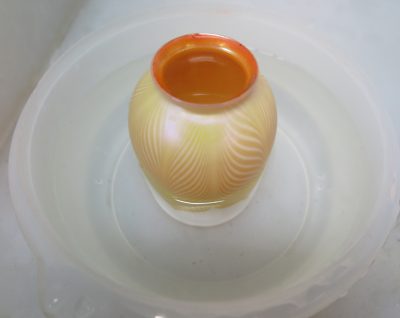
- Fig. 9: Lampshade B155 in bowl of water.
-
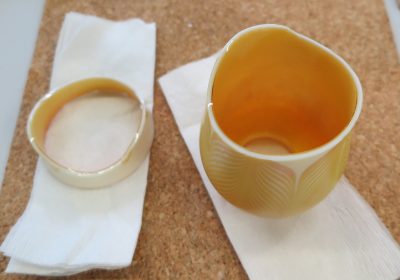
- Fig. 10: Lampshade after separation.
-
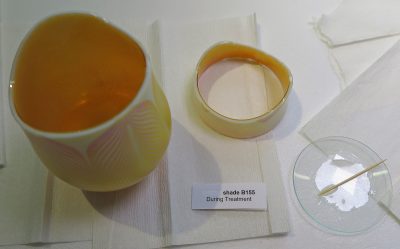
- Fig. 11: Applying epoxy resin to the break line of lampshade B155.
After leaving the shade overnight and gently pulling it the next day, I managed to separate the rim from the rest (figure 10).
I left the shade to dry, because otherwise the adhesive would not adhere properly. Then I applied an epoxy resin with a toothpick to the break line and attached the rim (figure 11).

Fig. 12: Lampshade B155 after treatment.
Figure 12 shows the end result. The discolored adhesive is gone and is not attracting attention any more, and therefore the lampshade can be viewed true to the makers’ intent.
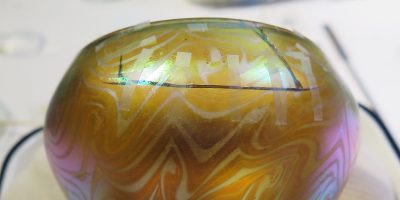
Lampshade B93
Condition before treatment: There was a previous restoration of three shards (two larger ones and one tiny one), which were slightly misaligned (figures 13 and 14).
-
- Fig. 13: Lampshade B93 before treatment.
-
- Fig. 14: Lampshade B93 before treatment; detail of previous repair, misalignment visible at bottom.
Challenge
This lampshade was translucent; therefore, an epoxy resin would be the adhesive of choice. For the best result it should be an epoxy resin with a refractive index as close as possible to that of the glass. The refractive index depends on the composition of the glass. For instance: lead glass has a higher refractive index than soda-lime glass.
Treatment
The previous adhesive was most likely an epoxy resin. After trying multiple solvents, the shards came apart with some manipulation after being placed in a bowl of warm water (figure 15).
This was not a quick process (a week), as you have to allow each solvent time before trying another solvent.
-
- Fig. 15: All shards are separated.
-
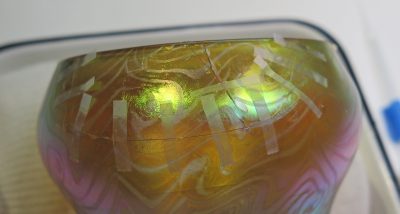
- Fig. 16: Shards are taped before applying adhesive.
I carefully used a scalpel to remove previous adhesive that was still present on the break lines, because the break lines have to be absolutely clean before bonding.
A good bond means that the shards should be aligned as best as possible, because any misalignment will attract the eye. In order to achieve this, I taped the shards very tightly to the rest of the shade with small pieces of adhesive tape (figure 16).
Then, I used a toothpick to introduce the epoxy resin in small drops to the break lines. Through capillary action, the epoxy resin was sucked into to break line.
However, I was not very happy with the result. The break lines did not disappear; instead, they were very visible (figure 17). It was clear that I had not used an epoxy resin that was a good match to the refractive index of the glass. I suspected that the glass contained lead, because the epoxy resin I used has a refractive index closer to soda-lime glass.
-
- Fig. 17: After applying first epoxy resin.
-

- Fig. 18: After applying final epoxy resin.
XRF analysis confirmed this. XRF (X-Ray Fluorescence) is a non-invasive method to determine the chemical composition of a material.
Luckily, the resin had not cured yet (the epoxy resin used has an eight to 12 hours curing time) and I was able to remove it completely. I tried again with an epoxy resin with a higher refractive index. As you can see in figure 18, the break lines are much less visible. They did not completely disappear, partly because there are small areas of loss of the surface, but the result is much better than my first attempt.
After the epoxy resin had cured, I removed the tape and tiny amounts of excess adhesive that had slipped under the tape.
-
- Fig. 19: Lampshade B93 after treatment.
-
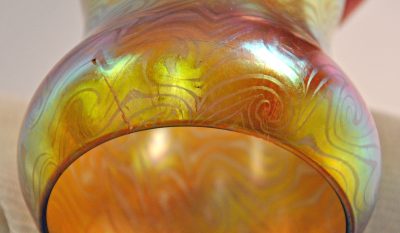
- Fig. 20: Detail of lampshade B93 after treatment.
My experience illustrates that each treatment consists of carefully weighing different options, and that rarely is it a case of one-treatment-fits-all. During my internship, I learned many other aspects of glass conservation, and I am very grateful to Stephen Koob, Astrid van Giffen, and Lianne Uesato for their guidance and support and for making my stay such a wonderful experience.
[1] National Park Service. “The Use Of Ultraviolet Induced Visible-Fluorescence In The Examination Of Museum Objects, Part II.” Conserve O Gram, 12 2000.
3 comments » Write a comment