This is the third in a series of blog posts addressing photographic lighting techniques for transparent glasses. It builds on the techniques discussed in the first two posts, Photographing glass, part 1 and Photographing glass, part 2.
In the first two posts, I used colorless engraved glasses to demonstrate how we can reveal detail by exploiting the ways glass interacts optically with its surroundings in a carefully controlled lighting environment.
In this third post, I use two different objects without engraving to demonstrate how the same lighting principles can be used to capture more subtle elements like tooling marks and optic ribbing. I also present a few techniques used to define edges and introduce controlled reflections. My goal is to capture details that provide insight into the process of making the objects as well as the properties of the glass itself.
As with the first two posts in this series, all objects are photographed on a translucent white acrylic surface (PlexiGlas 2447 with a P95 matte finish).

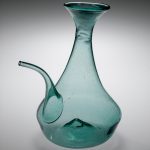
The first study object is an 18th century Spanish Porron (55.3.39). To begin, I positioned one broad soft light above and slightly behind the object with backlights under the table. The lighting here is starting off at a more advanced stage than with examples in the previous posts in this series, so there is already a nice amount of contrast between light and shadow in the background.

Next, I positioned a tightly focused Fresnel spotlight behind and to the left of the object and aimed it at the porron.

The effect of the spotlight is subtle, but the small, controlled specular reflections and catchlights in the image on the right reveal the “glassiness” of the object and help the viewer understand the interior shape of the base of the vessel. Notice how the inside curve of the base and the raised kick look more dimensional in the image on the right.

In order to better show details like tool marks and air bubbles, as well as to give the overall object more visual “weight,” I lowered the light falloff behind the porron by adding a foil flag to the overhead soft light. Because glass distorts and refracts what we see through it, the increased contrast in the background results in increased contrast in the object. However, now that the background is darker behind the upper part of the porron, the reflected light on the flared underside of the neck is too bright and the edge separation from the background is weak.

Because the flared underside of the neck is reflecting the lit table surface, carefully placed black cards can be used to define the edge of the glass by selectively blocking part of the light.

Again, the effect here is subtle but, in particular, notice how the edges are defined more cleanly in the image on the right.

For comparison, here is where we started on the left, compared to the final image on the right. The left image is already quite good at representing the object, but the image on the right appears more dimensional and shows more detail.

The second study object is an 18th century Roemer from Northern Europe (72.3.189). As with the porron, I started off with a soft light positioned above and slightly behind the object with backlights under the table.

This sequence of images shows the effect of increasing the contrast of light to shadow in the background by first turning off the overhead soft light and then the furthest backlight. Notice how the optic ribbing becomes more prominent, along with chill marks and other imperfections in the glass.

The one advantage the first image in the sequence has is the surface reflections that show the reflectivity of the glass. Unfortunately, they form a distracting shape on the foot and they obscure detail in the bowl of the Roemer.

In order to introduce some controlled surface reflections, I set up a Fresnel spot light aimed at a shiny reflector card in front of the object.

Using the reflector card rather than lighting the object directly allows for more precise placement of reflections to reveal detail. In this detail, for example, notice how the reflections on the right show the ribbing on the stem. Once again, this is a subtle effect, but it is the difference between the flatter image on the left and the more dimensional, “glassier” image on the right.

For comparison, here is where we started on the left, compared to the final image on the right.
As with the first two posts in this series, these examples demonstrate that our perception of transparent glass is really an observation of how the glass object interacts with its environment as it transmits, refracts, reflects, and distorts light. To capture detail in glass photographically, we must then carefully control the lighting environment.
2 comments » Write a comment