There’s no record of how it happened, but sometime in the past 132 years, this glass model of a sea star was broken and lost one of its arms. The model originally had five solid glass arms which were glued into corresponding openings in a hollow central body. Two double rows of tiny glass feelers are glued onto the sides of each arm. The colorless glass was expertly painted to accurately portray the creature. The model is broken in various places, three of the arms have become detached from the body and one of those is now lost.
-
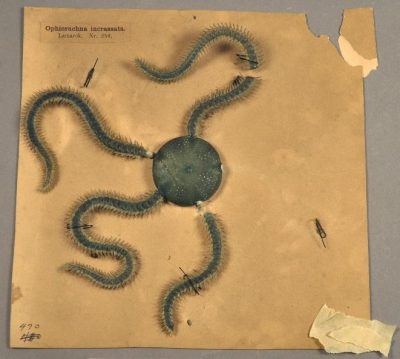
- Before treatment of Ophiorachna incrassata (Nr. 258), Leopold and Rudolf Blaschka, Dresden, Germany, 1885. Lent by Cornell University, Department of Ecology and Evolutionary Biology. L.17.3.63-470.
-
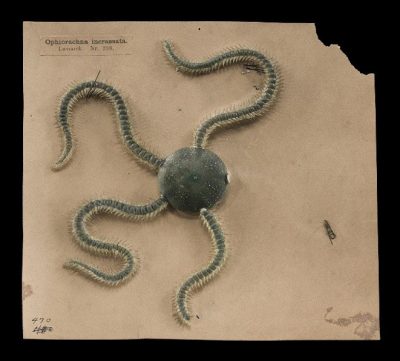
- After treatment of Ophiorachna incrassata (Nr. 258), Leopold and Rudolf Blaschka, Dresden, Germany, 1885. Lent by Cornell University, Department of Ecology and Evolutionary Biology. L.17.3.63-470.
Conservators often make replacement parts (fills) when the objects they are treating have missing pieces. This is usually done by taking a silicone mold from a similar area and using that mold to cast an epoxy fill. One of the two remaining detached arms was intact and closely resembled the shape of a faint shadow left on the paper card base by the missing arm. Because the painted surfaces and many tiny glass feelers on the arm could easily be damaged during the molding process, this made the usual method of creating a replacement part impossible.
Though the missing arm was not needed for structural support, we realized that this was a unique opportunity to try 3-D printing to create a fill for a glass object.
A digital image file is required to print in 3-D. The reflectiveness and transparency of most glass makes obtaining a good scan and rendering very challenging. The Blaschka models have paints and coatings that make them matte and less transparent and therefore more feasible to scan. Watch this video with the Museum’s conservators to learn more about the Blaschkas’ models and see this sea star during its conservation treatment.
The conservation department teamed up with the Museum’s interactive developer, Ryan Langille, to see if it was possible to 3-D print a replica arm.
The project happened in two phases: the first was to scan one of the remaining glass arms, the second was to print the arm in resin at the same level of detail as the Blaschkas’ model.

Scanning the arm
Ryan used a Shining 3D EinScan-S structured light scanner, which is non-destructive, an important aspect when working from original objects. Before scanning one of the sea star’s arms, he ran multiple test scans using objects with different attributes to see how the scanner would react. Tests were run on objects with fine details, colored glass, highly reflective surfaces, and matte surfaces. Along the way, Ryan made adjustments for the variables including reflectivity, transparency, and resolution.
-
- The individual feelers did not properly scan, and would be recreated in the rendering.
-
- In this animation from Sculptris, the darker areas indicate that there is more complexity in the form.
To scan the actual object, a silicone mount was used to hold the arm upright so that every portion of it was visible. It took 17 passes on the scanner to get the full detail of the model at .2mm resolution. Ryan and the conservators discussed the final scans—they were as accurate as possible for a scan of a glass model, but there were still a few missing components, specifically the tips of the small glass feelers along the outside of the arm, that were too transparent and reflective to scan. Since the team was not attempting to create an exact replica of the scanned arm, Ryan used a sculpting program, Sculptris, to recreate missing feelers in the rendering. Using the base of the feelers that appeared in the scan, he was able to extrapolate their size and direction and recreate them as closely as possible. A portion of the rendering was completed in its entirety to use as a sample and test print as a proof-of-concept.

Printing the arm
The model was test-printed using a Ultimaker 2 Extended 3D printer. Various tests were performed to adjust heat and calibrate the machine to a high precision. In the test prints, Ryan quickly realized that slicers were generating support material that wasn’t viable for the print and he needed to be able to create custom supports—the filler around the print needed to make the model that is removed after it’s fully printed. After more test prints, he knew he needed an even smaller nozzle for the printer head to get a better resolution. Standard nozzles for 3D printers are .25mm, .4mm, .6mm, or .8mm—for this print, Ryan found a .15mm experimental nozzle that just might do the trick.

Examining the test prints with conservators Astrid van Giffen
and Steve Koob.
More than 25 test prints were made using varying nozzle sizes. The end result is a small white plastic model that resembles the glass arm, but lacks the finer details that the Blaschkas were able to achieve in glass. Even at the lowest temperature and the slowest speed with high retraction settings, stringy oozing plastic was still connecting the tiny feelers during travel moves of the print head.
-
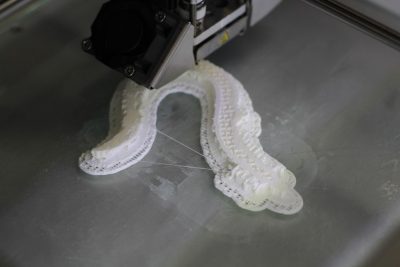
- A print with the .15mm nozzle
-
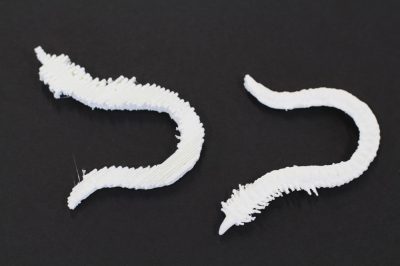
- The finished prints with supports removed.
The challenges of scanning glass and printing at such a fine level of detail proved to be too much for the 3-D printers available to the Museum, but the research and testing that occurred along the way opened the possibility for future projects combining glass and 3-D printing technology.
This project took place during conservation efforts in advance of the Museum’s exhibition Fragile Legacy: The Marine Invertebrate Glass Models of Leopold and Rudolf Blaschka (May 14, 2016 to January 8, 2017).