Conservators are trained to carefully examine an object before they treat it. Not only to document the object’s condition but also to understand how it was made and what materials were used. In some cases, like Leopold and Rudolf Blaschka’s glass models of marine invertebrates, a conservator’s examination is one of the main sources of information about the object.
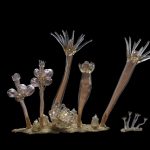
Leopold and Rudolf Blaschka wrote very little about how they created their glass models of marine invertebrates. Much of what we know about how they were made has come from observations of the models themselves and from the materials left in their studio after Rudolf’s death. Identifying the different types of materials and how they were used can reveal a lot about how a model was made. Most scientific analysis needed to fully identify the composition of the materials can be very time-consuming and costly. This means it was not possible to fully identify all of the materials used in each of the models on display in the Fragile Legacy exhibition. There are simpler techniques, however, that we can carry out in the conservation lab that allow us to identify materials in a more general way.
One of these techniques is to examine an object under ultraviolet (UV) light. Under UV light, certain materials fluoresce, or glow in distinctive ways. For example, shellac, a natural resin that was sometimes used in the past as a glue for repairing glass and ceramics, fluoresces bright orange. UV examination is especially useful for identifying old repairs or for examining mixed media objects like the Blaschka models. Even when we can’t identify a resin, we can see where different materials were used, which can be hard to see in ordinary, visible light. Glass itself does not always fluoresce under UV light, but if it does it can tell us something about its composition. For example, uranium glasses fluoresce bright yellow-green, antimony in white Roman cameo glasses often fluoresces a light pink or pink-orange, manganese usually produces a yellow fluorescence, and high-lead glasses fluoresce an icy blue color.

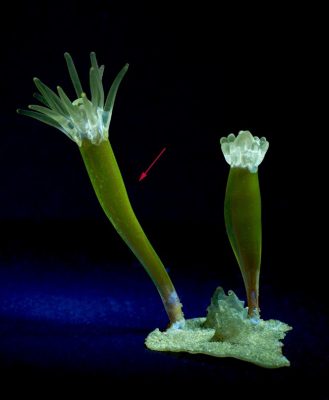
Figure 1: The tiny life-sized version of Podocoryne carnea under long wave UV light shows the orange fluorescence of shellac which was used to glue it onto its paper card base.
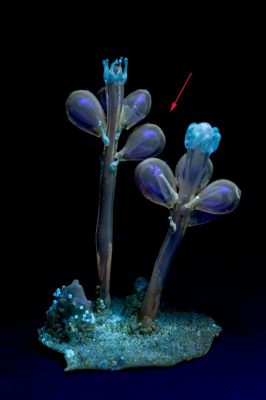
In our conservation lab, we use two different UV lights; our shortwave lamp produces ultraviolet light with a dominant wavelength of 254 nm (UV-C), while the longwave lamp has a dominant wavelength of 365 nm (UV-A). As you can see in the images below of Blaschka model Nr. 173, the materials fluoresce differently under each lamp.

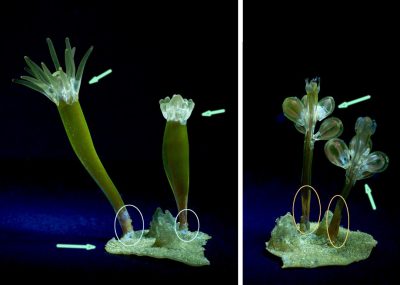
Figure 2: Two sections of Podocoryne carnea under shortwave UV

Figure 3: The same two sections of Podocoryne carnea under longwave UV
Under shortwave UV, the protrusions attached to the top and middle of the two smaller stalks on the right all fluoresce icy blue, indicating that they are a high-lead glass. Interestingly, the similar but larger protrusions on the tops of the two larger stalks on the left do not fluoresce and must have a different composition. If we look at these same areas under longwave UV, we can see that the larger protrusions on the left fluoresce brightly, but only where they attach to the stalks. The protrusions on the smaller stalks do not fluoresce at all. What does fluoresce on the smaller stalks are the areas where the bubble-like polyps attach to the stalks. Under longwave UV, the glue, not the glass, fluoresces most brightly. This examination shows us that similar parts were made and applied with different techniques. The smaller protrusions are lead glass and were hot fused to the stalks, while the larger protrusions are a different type of glass (likely soda-lime) and are glued on.
Click on the images below to see what else we were able to discover:
-
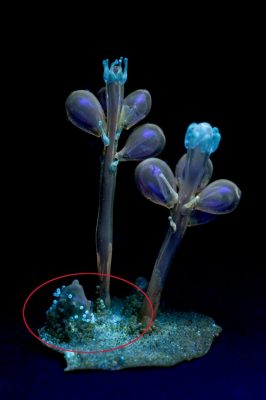
- Under shortwave UV, some of the tiny glass beads on the base also fluoresce the typical icy blue of lead glass, but not all of them do. This is not because the beads have different compositions, but merely that most are covered with glue that masks the fluorescence.
-
- The dull yellow fluorescence seen under longwave UV indicates manganese is present in the glass.
-

- Under both longwave and shortwave UV light, dark orange streaks are visible on the lower parts of the stalks. This is a resin, probably the same one that was used to glue the stalks to the base. The streaks contrast with the rest of the stalks, which were not painted with a coating like most of the glass on many other Blaschka models.
-
- Tips and base of the life-sized version appear to have resin on them, but we’re not sure why.
-
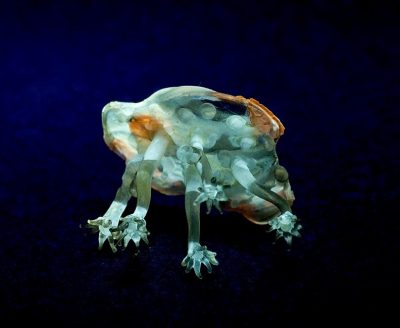
- The purple you see inside the bubble-like polyps is a reflection not fluorescence.
-
- Although we can’t identify most of the resins based on their fluorescence, we can see that there are at least four different kinds of resins or waxes in this model: the orange fluorescing shellac is only found on the life-size version (see figure 1), the others are marked in the image above with green arrows, white circles, and orange circles. The bluish fluorescence in the white circles could be a later addition from a previous repair.